Migrate from Google Workspace to Microsoft 365

Deciding to migrate from Google Workspace to Microsoft 365 may be on the project list for some organizations. While both SaaS environments provide world-class business productivity and collaboration features, Microsoft 365 may better align with an organization’s current strategy and need for tooling for the hybrid workforce. Understanding the migration process is crucial to ensure data integrity, minimal downtime, and a smooth user transition.
Reasons to migrate from Google Workspace to Microsoft 365
Migrating from one major cloud platform to another is not a decision taken lightly. As organizations ponder the transition from Google Workspace to Microsoft 365, several compelling reasons often lead to the decision to migrate. Here are some of the most common reasons:
- Integrated Business Solutions: Microsoft 365 (or Office 365) provides an “all-in-one” suite of productivity and collaboration tools. It includes Microsoft Teams, SharePoint, and Power BI, which companies can use to integrate their communication, data storage, and analytics under one umbrella.
- Familiarity with Microsoft Products: Many organizations have used Microsoft Office applications on-premises for decades now. Microsoft operating systems are also the norm in the enterprise campus environment. The familiarity with Microsoft solutions and products translates to the same familiarity with the cloud suite of solutions since Microsoft has preserved much of the same look and feel of these solutions.
- Advanced Security Features: Microsoft 365 has robust security measures, including Advanced Threat Protection (ATP), data loss prevention, and more in-depth compliance capabilities. For organizations with stringent security requirements, this can be a significant draw.
- Comprehensive Compliance and Governance: Microsoft 365 offers advanced compliance solutions, crucial for industries like finance, healthcare, and government that must adhere to strict regulatory requirements.
- Hybrid Deployment Options: For organizations that want a balance of on-premises and cloud solutions, Microsoft 365’s hybrid deployment provides the best of both worlds. This is particularly useful for businesses in transition or those with specific data residency requirements.
- Streamlined Collaboration: With tools like Teams and SharePoint integrated into the suite, collaboration is intuitive and integrated. Features like real-time co-authoring in documents and integrated chat functions make teamwork smoother than ever. Teams has gained wide adoption as many prefer the integrated files, chat, and collaboration it provides.
- Expanded Storage Options: OneDrive for Business, a part of Microsoft 365, offers extensive storage capabilities with advanced sharing options, appealing to businesses with growing data needs.
- Cost Efficiency: For some organizations, especially larger ones with multiple needs, Microsoft 365 can provide more value for the cost, bundling various essential services under one subscription.
- Customizability and Scalability: Microsoft’s suite offers a range of plans and configurations, enabling businesses to choose what fits best and scale services according to their growth. These may align better than Google Workspace plans.
- Migration and Integration Support: Microsoft provides robust support and tools for businesses looking to migrate. This includes detailed documentation, migration wizards, and support teams that ensure a smooth transition.
Preparing for the Google Workspace to Microsoft 365 migration
Arguably, the most critical step in migrating from Google Workspace to Microsoft 365 is preparing for the migration process.
Before diving into the migration tasks, thoroughly audit your Google Workspace environment. Ensure you’re aware of all the details, such as the number of Google Workspace users, the size of Google Docs and Google Drive storage, and any other online storage platforms that might be connected.
Understanding migration tools
Familiarize yourself with available migration tools. The Exchange Admin Center (often called the new EAC) is vital in this process. While you might be a first-time user, the new EAC provides an intuitive interface to navigate the migration.
You can create your migration batches from the Exchange Admin Center (EAC) for migrating users to Microsoft 365.
Data Loss concerns
Ensure that you have SaaS backups in place before you begin the migration. Data loss during migrations can occur. Prioritize your essential data and plan for contingencies.
Having a data protection solution in place before the migration process begins ensures that as soon as the first bit of data lands in the Microsoft 365 environment, you have the tools in place to start protecting the data.
Setting up the migration endpoint
To start the mailbox migration path, head to the Exchange Admin Center. Here, you’ll notice the “Migration” tab. Clicking on it should lead you to the ‘migration endpoint page’. Microsoft has a highly “wizardized” approach that makes this process extremely easy when it comes to migrating mailboxes from Google Workspace.
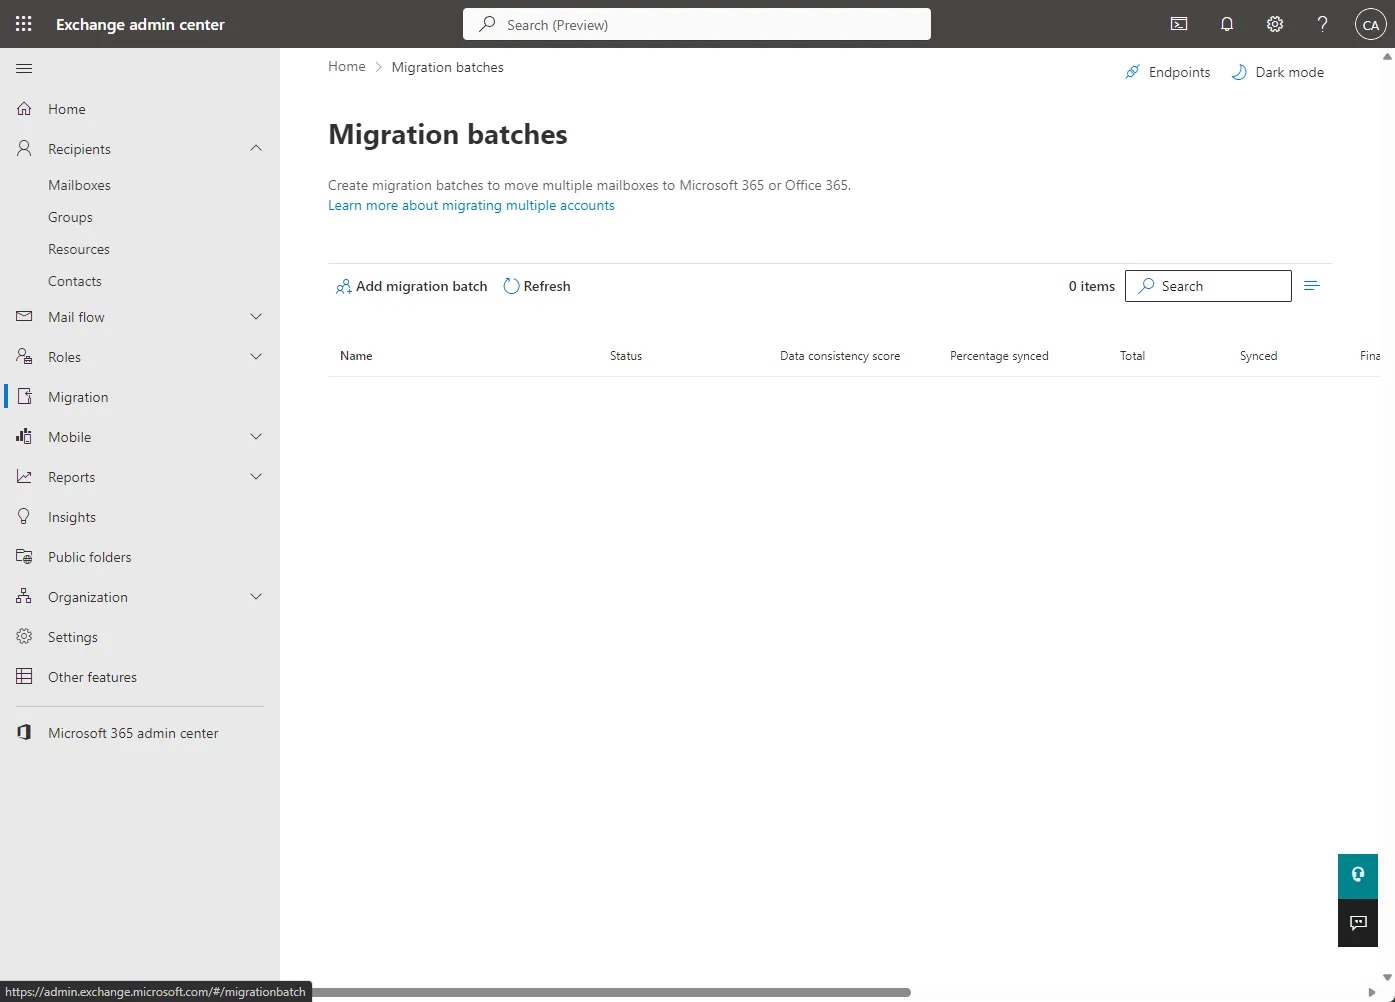
Adding a migration batch using the Add migration batch wizard.
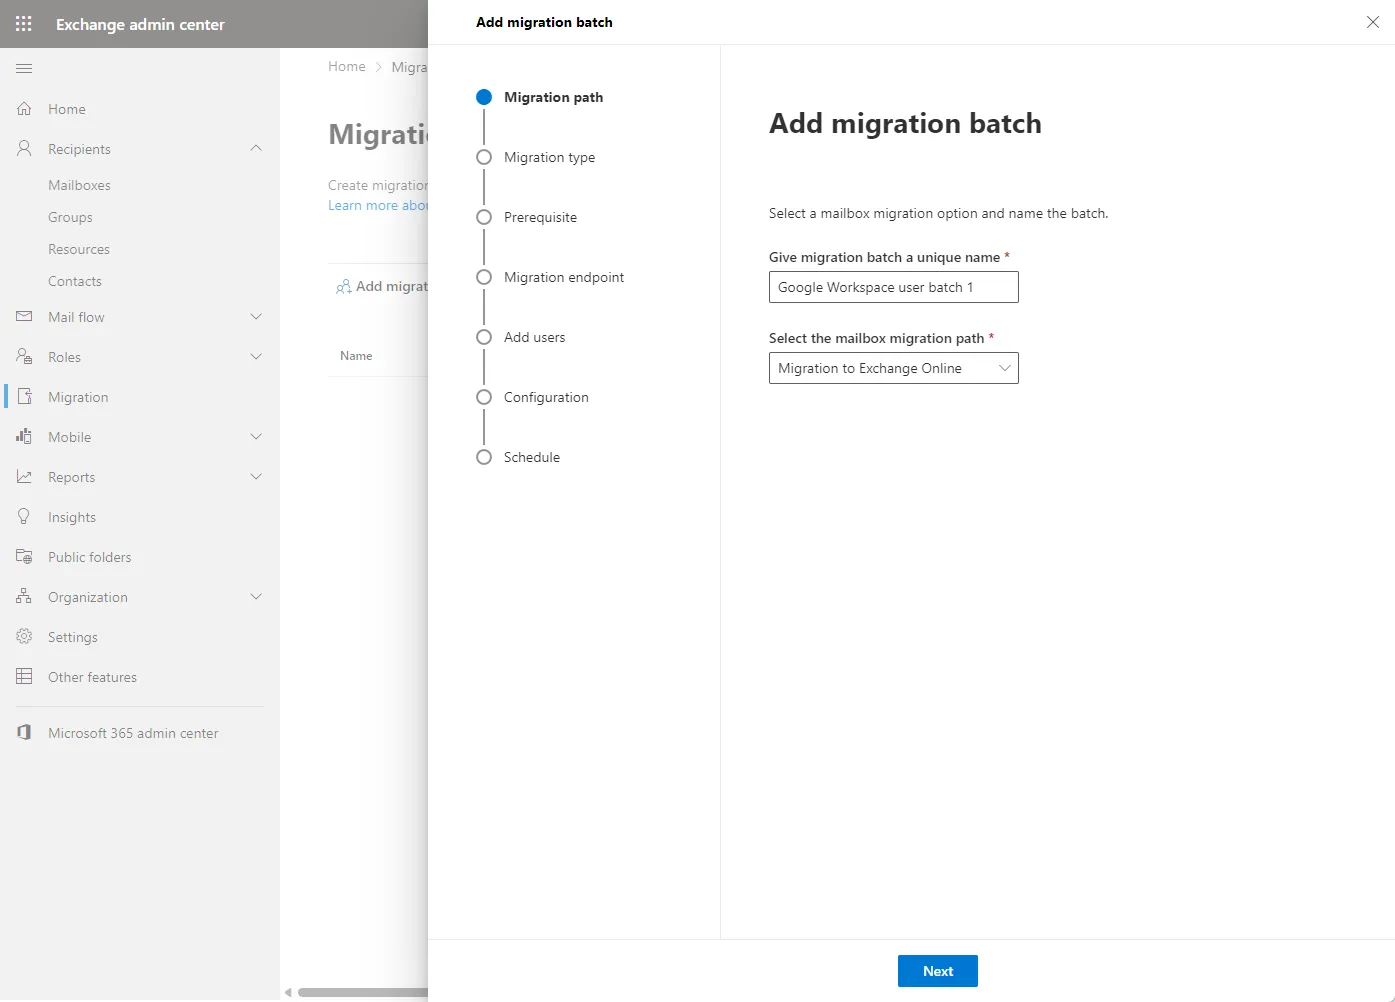
Creating a new migration endpoint
As part of the Migration wizard in Exchange Admin Console, you will be asked to Select a Migration endpoint or create a new migration endpoint.
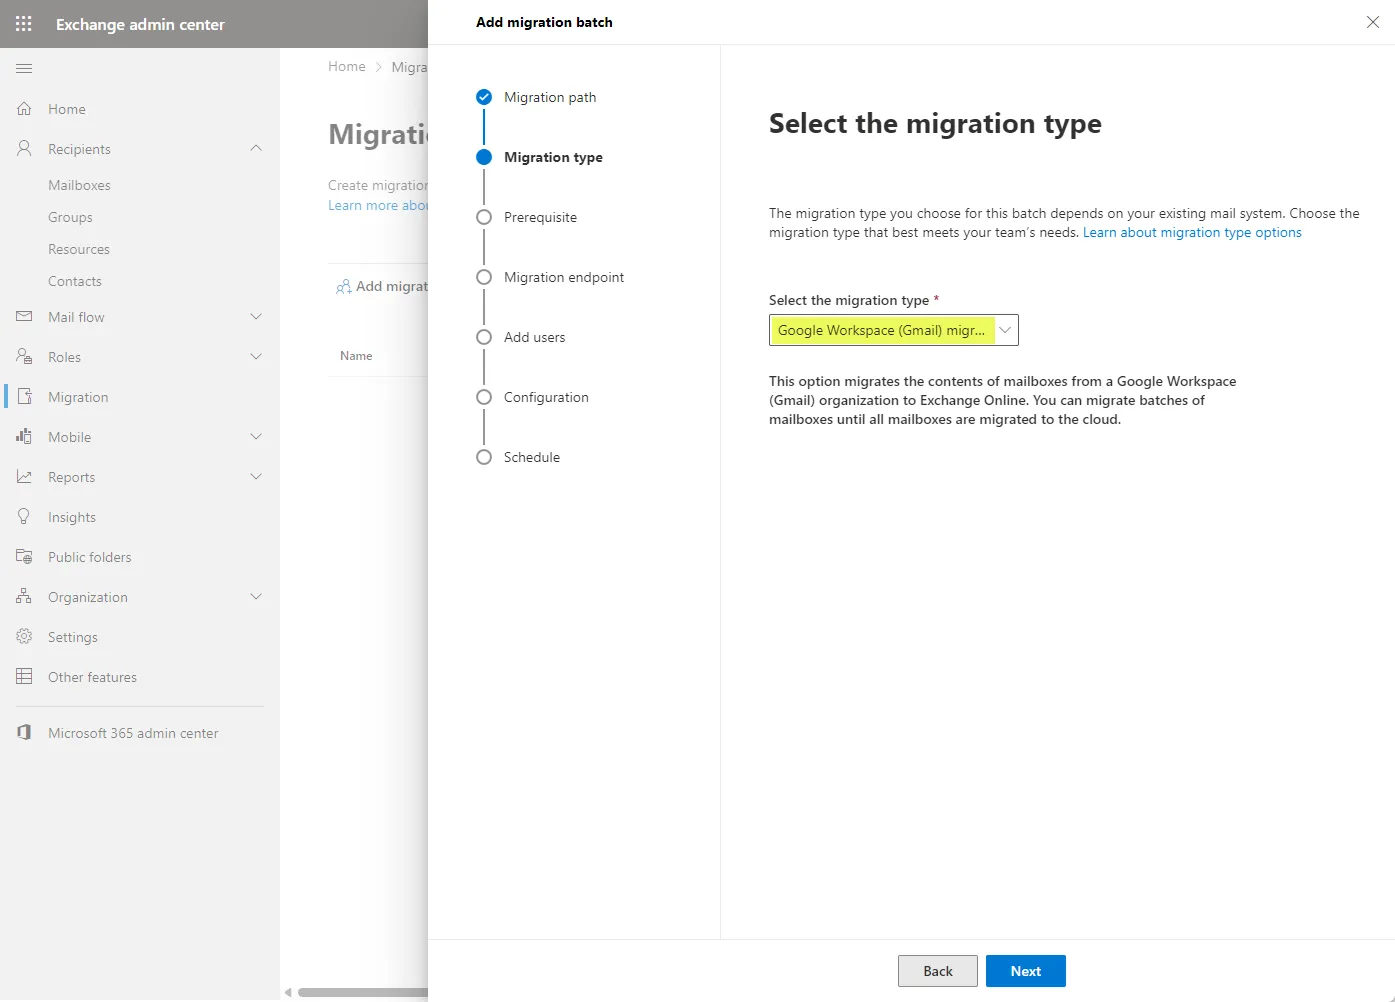
While on the select migration type page, opt for ‘Google Workspace Gmail migration‘. Once done, the system will lead you to the Gmail migration configuration page.
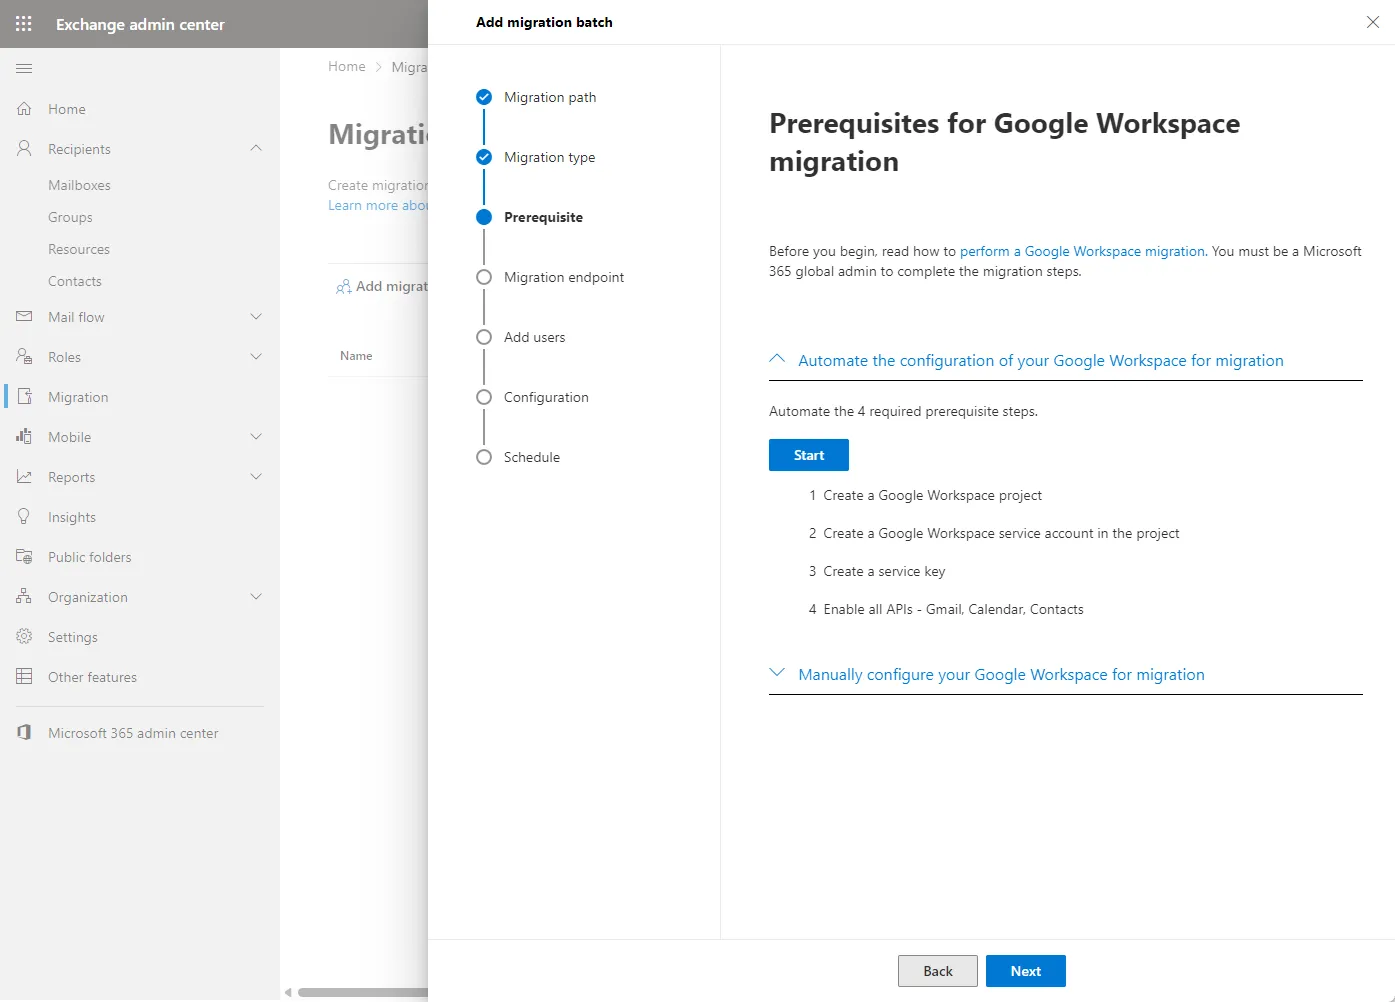
You will see the Prerequisites for Google Workspace migration page that will step you through the process of connecting your Google Workspace environment with the Microsoft 365 environment.
Configuring the migration batches
There are a couple of options for configuring your migration batches once you create the migration endpoint. These include the following:
- CSV and User Mailboxes: The CSV file is essential to this migration. This file contains Gmail primary email addresses of the users you aim to migrate. On the “Add user mailboxes page”, there’s an option to click “import CSV file”. Once imported, the system will auto-populate the email addresses.
- Batch Creation: Migration batches are created via the migration batch wizard. As the migration batch wizard opens, click “add migration batch”. You’ll be directed to the ‘schedule batch migration page’. Here, you can define parameters such as the maximum concurrent migrations or even the maximum concurrent incremental syncs.
Final Steps and post-migration checks
After you have configured the migration endpoint and the migration batches, it is time to launch the migration process. Note the following:
- Launching the Migration: With everything set up, initiate the migration. Once batches are up and running, you can monitor the batch status. The ‘Google Workspace migration page’ will provide real-time feedback.
- Ensuring Data Integrity: Post-migration, you will want to check for data consistency. Verify emails, Google Docs, and any content from Google Drive to ensure it’s been appropriately transferred to Office 365 or Exchange Online.
- Transitioning Users: As you migrate Google Workspace mailboxes, remember the human element. Users transitioning from Google Workspace to Microsoft might require training. Introduce them to Microsoft Teams and the new Office 365 features.
Common challenges and their solutions
While configuring, DNS records might present challenges. Familiarize yourself with the migration type page. Here, specific DNS configurations are requested and needed for the migration.
Occasionally, sync errors might happen. You may need to monitor users in the individual batches to ensure there are no sync errors. If there are, note the detailed errors for the possible resolution to migration issues.
Listen to user feedback during the process. Some users might face challenges with specific features, or there might be discrepancies in data migration. Address these with a combination of training and tech adjustments
How Spin.Ai Can Help Protect Your Data During Migration
As mentioned earlier, protecting your SaaS data when the first bit lands in the target SaaS environment is critical. Spin.Ai is known for its cybersecurity and data protection solutions, and can be used to effectively protect your data during the transition from Google Workspace to Microsoft 365.
Note the following features provided by Spin for protecting your data:
- Automated Daily Backups: Spinbackup offers automated daily backups of your Google Workspace data. This means you have a secure and updated backup of all your essential data before the migration begins. If there is any data loss during migration, you have a reliable means for recovery.
- Version Control: Spin keeps multiple versions of your documents, ensuring you can revert to a previous state or retrieve a deleted file during migration.
- Ransomware Protection: Migration periods can sometimes make systems vulnerable to threats. Spin’s advanced machine learning algorithms monitor for ransomware attacks in real-time, ensuring that your Google Workspace data remains uncompromised before shifting to Microsoft 365.
- Data Loss Prevention: Spinbackup’s Data Loss Prevention solution ensures that data, be it from human errors or system glitches, can be quickly recovered.
- Data Migration Assistance: Spin provides tools and services to facilitate cloud data migration, ensuring a smoother transition from Google Workspace to Microsoft 365.
- Data Audit: Gain insights into your data with Spinbackup’s comprehensive audit capabilities. Understand what data you have, who has access to it, and any potential risks — vital information to have before migrating.
- Cloud-to-Cloud Migration: Spin specializes in cloud-to-cloud backup and migration, making for an ideal partner when transitioning between cloud giants like Google Workspace and Microsoft 365.
- Data Encryption: Data is encrypted in transit and at rest, ensuring it’s protected against unauthorized access when backed up.
- Compliance Assurance: For organizations that need to adhere to strict regulatory guidelines, Spin offers compliance solutions that ensure data handling, storage, and transfers meet industry standards.
Spin.AI provides an automated solution to help protect business-critical SaaS data found in Slack, Google Workspace, Microsoft 365, and Salesforce. To speak with a Spin Solution Engineer and discuss how SpinOne can help protect your Microsoft 365 data, during and after migration, click here to book a demo: Request a Demo of SpinOne.
FAQ
Should we switch from Google Workspace to Microsoft 365?
It depends on the needs of your business. Micorosft 365 has more security features for organizations. However, it’s also a more costly solution. The migration bears many security risks, like data loss or theft, and system vulnerability due to misconfiguration. It can cause downtime and will require additional costs.
Can we migrate from Google Workspace to Office 365?
Yes. Microsoft 365 (formerly Office 365) has functionality for migration.
What is the best tool to migrate Google Workspace to Microsoft 365?
Microsoft 365 native functionality is a great tool for data migration. However, if you need an additional level of security, we suggest using SpinOne.
Was this helpful?
- Reasons to migrate from Google Workspace to Microsoft 365
- Preparing for the Google Workspace to Microsoft 365 migration
- Setting up the migration endpoint
- Configuring the migration batches
- Final Steps and post-migration checks
- Common challenges and their solutions
- How Spin.Ai Can Help Protect Your Data During Migration
- FAQ
How Can You Maximize SaaS Security Benefits?
Let's get started with a live demo
Latest blog posts
How to Restore A Backup From Google Drive: A Step-by-Step Guide
April 10, 2024Backing up your Google Drive is like making a safety net for the digital part... Read more
Protecting Partner Margins: An Inside Look at the New Spin.AI Partn...
April 2, 2024Google recently announced a 40% reduction in the partner margin for Google Workspace renewals –... Read more
Expert Insights: SaaS Application Data Protection Fundamentals
March 21, 2024SaaS applications appeal to organizations because they make running the application “somebody else’s problem.” However,... Read more
