How to Backup Outlook Emails in Just a Few Clicks

How to backup Outlook emails if you have a vast number of messages from multiple accounts? Well, there are many different ways. But not all of them will fulfill your needs in security and functionality.
Some users prefer native tools for this purpose because they are free. However, native tools are not exactly a backup. Still, you can use them as a temporary solution to back up Outlook emails, and we’ll show you how. Also, we’ll show you how to use professional backup software with advanced functionality.
Let’s start!
How to Backup Outlook Emails With Native Tools
In case you don’t need to back up a vast amount of data regularly, you may use free native tools. They all have their limitations since they are not designed initially as backup tools.
Using native Outlook email backup has a major concern: the risk of hacker attacks. Additionally, viruses can infect your account, jeopardizing your backup emails in Outlook. Consider this: if ransomware infects your cloud or computer, it could affect all your emails.
If so, you can end up paying a ransom to regain access to your emails. Or worse – they can be permanently deleted. Given the fact that people and organizations fall victim to ransomware every 14 seconds in 2019, your chances are higher than you think.
But provided that you are cautious, you can be pretty successful in using the following tools as your backup. Here is how to backup Office 365 email using in-build features.
Tool №1. Email Forwarding
Email forwarding is a native Outlook backup method that lets you create a free online backup for your emails. It enables you to copy your emails by forwarding them to another account. In case you lose your emails on the main account, the other one will “have your back.”
You also can keep your main account “clean” with lots of free space while copying everything on the spare one. Perhaps, the email forwarding is the easiest way to preserve non-critical data. To set up email forwarding, follow these instructions.
Web Version
- Go to the Exchange admin center.
- Select Recipients, then Mailboxes.
- You’ll see the list of users’ email addresses. Select the one you need to set up forwarding for.
- Within Mailbox, click Manage mail flow settings under Mail flow settings.
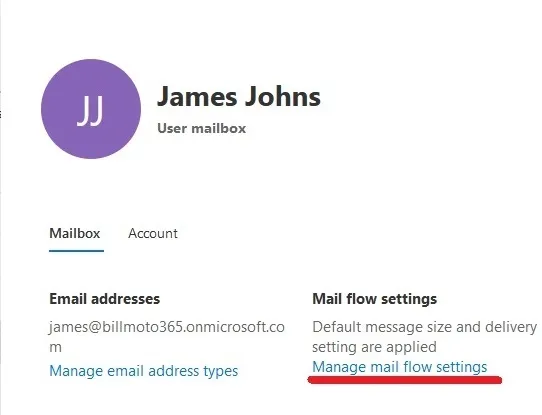
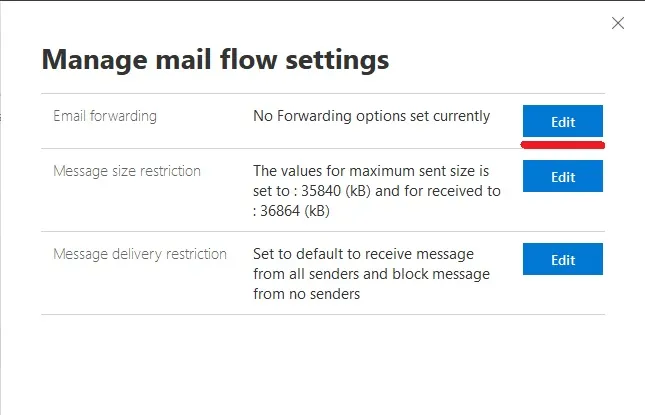
- Now you can configure email forwarding, including size and delivery restrictions. Select Edit Email forwarding.
- Enable Forward all emails sent to this mailbox and type the forwarding email address.
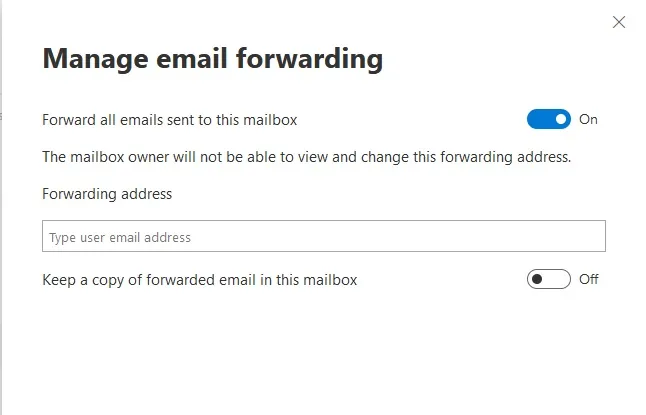
Now all your emails are backed up to the given address. But be aware, that if someone will hack your Microsoft account and delete messages, they can do the same with your spare account.
How to Backup Microsoft Outlook Desktop Version
Though there is no specific option for email forwarding on a desktop Office 365 version like it is on the web version, you still can do it. In the Rules and Alerts section, you can set the rule of following emails.
You need to do the following:
1. Set off your Outlook and go to Files.
2. Choose the option Info on the left side.
3. Press on Manage rules and alerts. A new window will open.
4. In the new window, choose the Email rules tab and click on New Rule on the top left corner.
5. The new window will appear, where you need to choose Apply rule on messages I receive and click Next.
6. The next will be setting the conditions of the forwarding. For example, you can set up a rule of forwarding only particular emails. If you want to back up the entire mailbox, click Next.
7. Put a tick near the option “forward it to people or public group.”
8. Go down to the next box named Step 2, click on the link “people or public group,” then click Next.
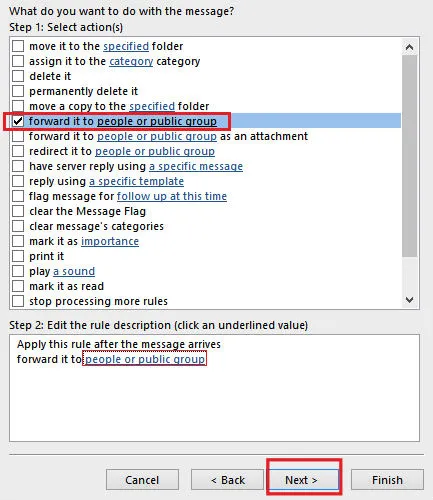
9. Type an email you want to forward your Outlook messages to and press Ok.
10. Overlook all the settings and, if everything is correct, click Finish.
Done! You set up the forwarding. However, this method has some limitations.
Limitations:
- One day you will run out of space
- Doesn’t forward previous emails you still need to forward them manually
- The user of the email account can turn the forwarding function off
- The spare email account is subject to the same widespread threats as the primary one: ransomware, viruses, hijacking, deletions, and so on.
Tool №2. Export/Import Wizard
Sometimes users ask how to backup Office 365 mailbox to pst. This is the tool that does it. Export/import wizard for Office 365 is similar to Google Takeout for G Suite. It lets you create a one-time export of your emails and save it locally on your computer, a cloud, or a flash drive.
You can also restore it by importing the saved file back to the mailbox. This function’s main advantage is that it doesn’t require a complicated deployment – a good choice for one-off operations.
To export any folder of your Outlook, follow these steps:
1. Open Outlook on your desktop.
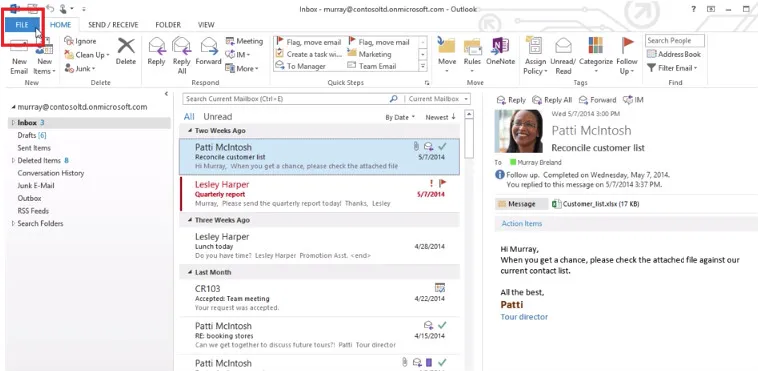
On Outlook 2007 choose Import and Export;
On Outlook 2010 select Open – Import;
On Outlook 2013 / 2016 / 2019 / Office 365 choose Open Export- Import/Export.
2. In the new window, you need to select the option Export to a file and click Next.
3. The type of file you export to is Outlook Data File (.pst)
4. Now choose what parts of your mailbox you want to download. You can apply Filter to further refine what you export. Also, you can export the whole mailbox by clicking on your email account at the top and putting a tick near the Include the subfolders. When you are ready, click Next.
5. On the next page, you need to click Browse to choose a location on your computer. Type the name of the file and click OK.
6. In the same window, choose one of three options about duplicates.
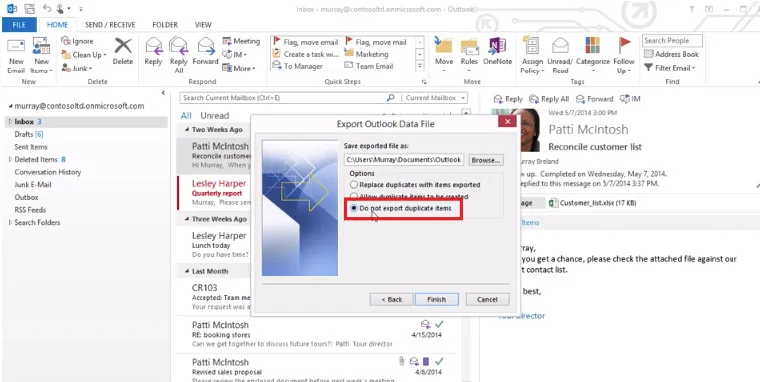
7. Click Finish.
The service exports files in the .pst format. It also may prompt you to set a password to this pst-file. If you don’t want to set a password, leave the field blank and click Ok.
Close Outlook and copy the exported file to your safe location.
Limitations:
- The main drawback of this method is that it doesn’t allow automatic backups. You have to save the information manually every time. If you forget to back up your latest data, you’re at risk. Issues like ransomware, accidental or intentional deletions, or account hijacking can wipe out all your current files.
- Extremely time-consuming if you need to protect many accounts.
- The Import/Export wizard is available only on the desktop version of your Office 365.
Tool №3. Auto-Archiving
Auto Archive is the tool that is used to clear your mailbox from old, but still important emails. It uses an aging period to determine which items to archive. In a way, Auto-Archiving can serve you as a backup option. Even though it is useless in cases of mass data recovery, it may help you to find and recover important emails.
Note:
- Archiving doesn’t copy items as the Export wizard does – it moves them. It means all archived emails will be kept in a separate folder, and you won’t find them in the initial folder they’ve been transferred from.
- The archiving method is handy in case you have a lot of old emails you don’t need right now but may need in the future.
- The archived emails will be stored in your Archive folder until you decide to delete them or to move them back.
- The archiving option is not set by default, so you need to activate it.
Follow these steps to set up Auto-Archiving:
- Set off your Outlook on your desktop.
- Go to the File tab and choose Options.
- Select Advanced>AutoArchive Settings.
- Then, click Run AutoArchive every and choose the frequency of the archiving. It is already set for 14 days by default, but you can choose any frequency that is comfortable for you.
- Click on Clean out items to set a period to move your files from Inbox to the Archive folder.
- Click on the option Move old items to and type a file name for the archived items to be transferred to, or click Browse to select from a list.
- Click on OK.
Ready! Now all the emails you’ve specified will archive automatically in the .pst format. You can easily access them by opening the Archive folder.
Limitations:
- Archiving doesn’t copy your files – it transfers them. When the files are in the archive folder, they disappear from the initial folder.
- You can’t restore all the emails in case of an emergency, like with backup.
- The Archive folder can’t be considered a safe place to save your emails. It could be in your mailbox or on your computer. This location exposes it to many threats, such as viruses and ransomware. It’s also at risk of hijacking and both malicious and accidental deletions.
These limitations are why you should consider using Auto Archive only as a transfer tool for your emails from one folder to another, not as a backup solution.
As you can see yourself, backup with native tools is an option only on a few occasions:
- It is the backup for individuals that don’t have much data;
- Data that needs to be backed up is not of high importance.
In all other cases, use specialized backup services with cybersecurity features. Only with those, you can be 100% sure that everything goes well and your data is safe and sound.
How to Backup Office 365 Mailbox in a Few Clicks
The only way to actually create a backup quickly (=in a few clicks, as promised) is by using Outlook backup software. There are a lot of tools on the market, so we created a comparison table of the top-3 cloud backup solutions for Office 365 data.
For an example of how to backup Outlook using a third-party backup, we used our service Spinbackup. This tool provides backup and recovery automation, versioning, regularity, and other features native methods don’t include. They will help you to automate the backup process. We’ll make a reservation right away – this way you can back up not only your Outlook but data of all Office 365 services.
To do all the steps with Spinbackup, you can backup Outlook for free, no strings attached –
After you do that, all the existing data on your Office 365 will be synced with SpinBackup the next morning. The same happens with the data of other users attached to your account. But before that, you need to customize which data will be backed up. The backup process itself is automated.
How to backup Outlook 365 emails with SpinBackup:
1. Go to the Admin Panel.
2. Go to Menu in the top left corner. Then press Settings.
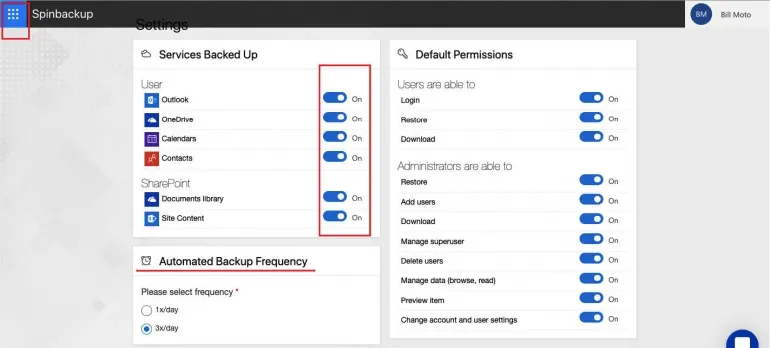
3. Choose services that need to be backed up.
4. Choose the frequency of the backup. You have two options: 1x/day and 3x/day.
All backed-up data will be seen on the dashboard. Also, you can see the backed-up data of other users by simply clicking on the Users in the Menu. From this panel, you can customize which data will be automatically backed up for particular users.
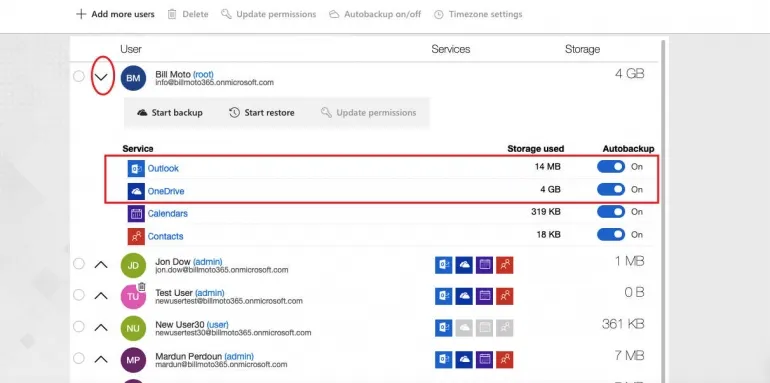
If you need to manually backup emails, do the following:
1. Go to Dashboard and press Users on the left side. Pick the user whose emails you want to backup. Click on the Exchange Online.
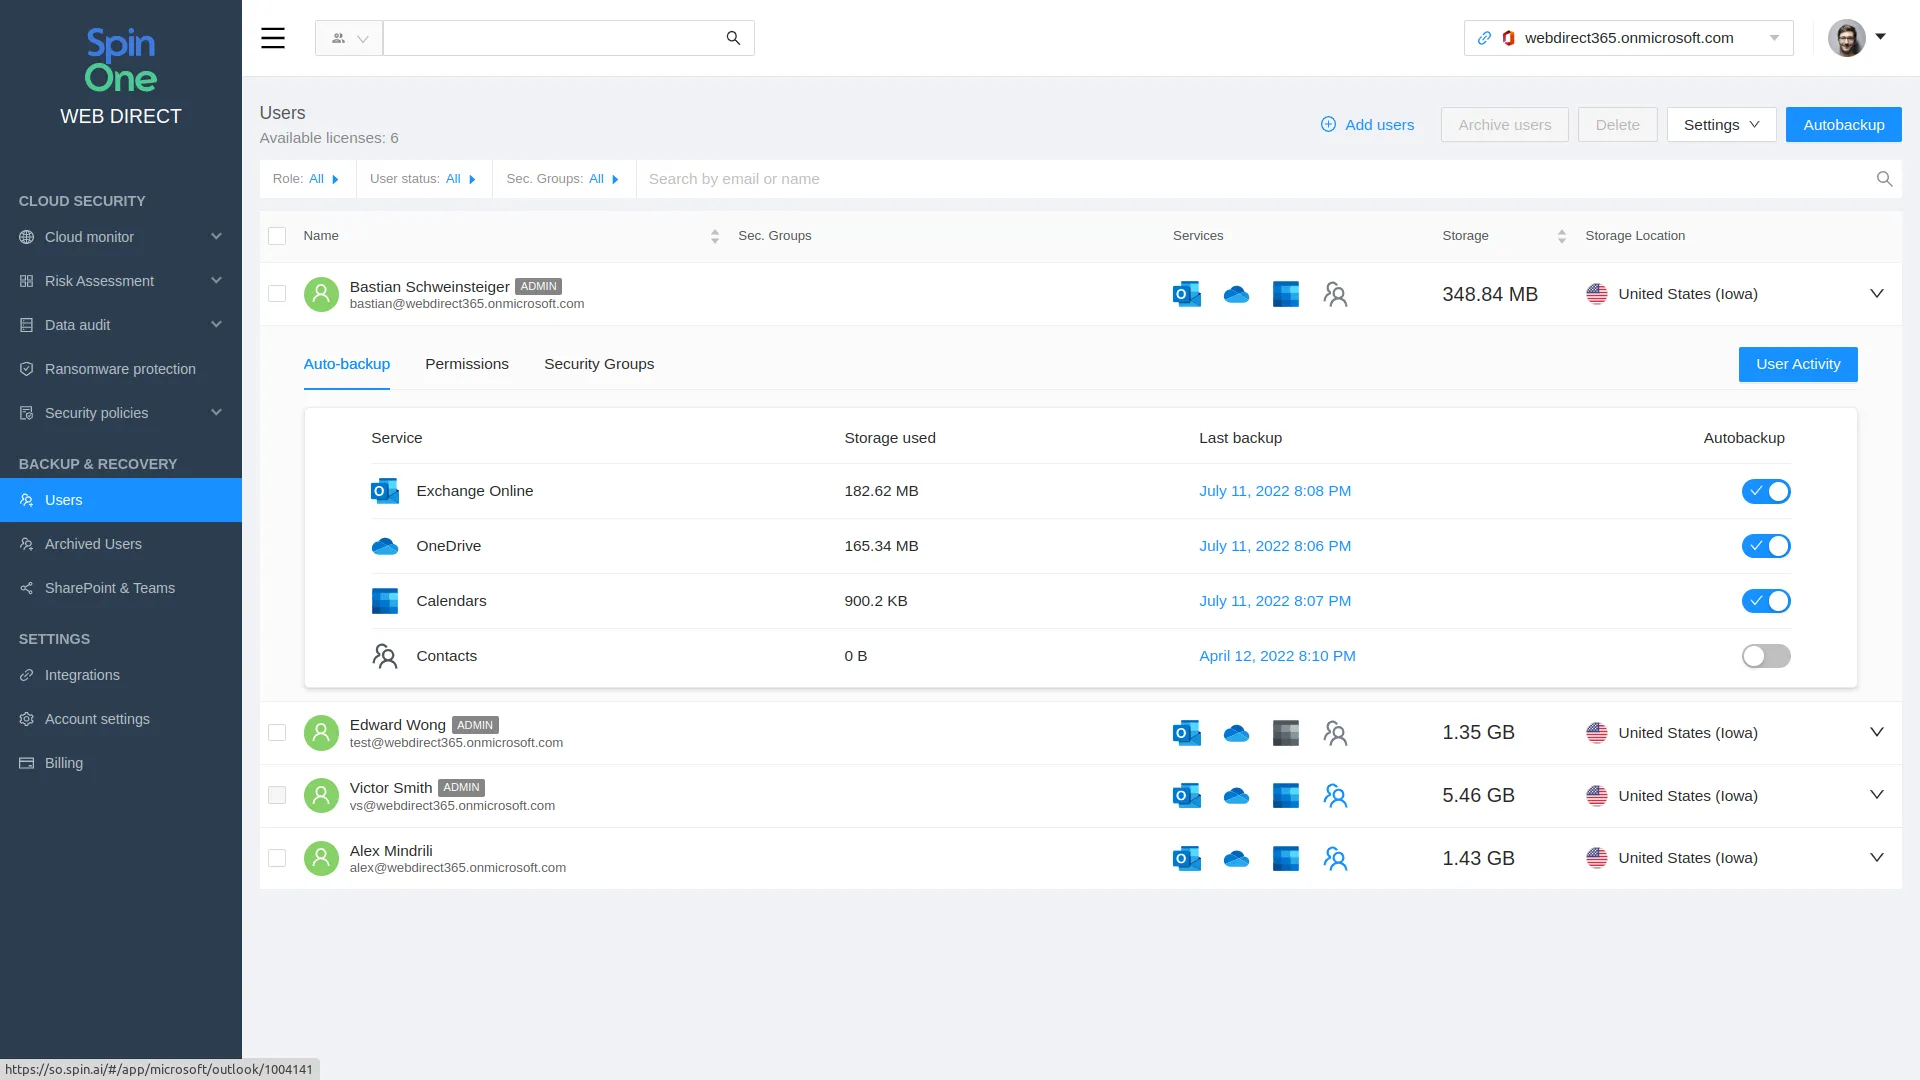
2. Choose the emails you want to backup. Then press Backup.
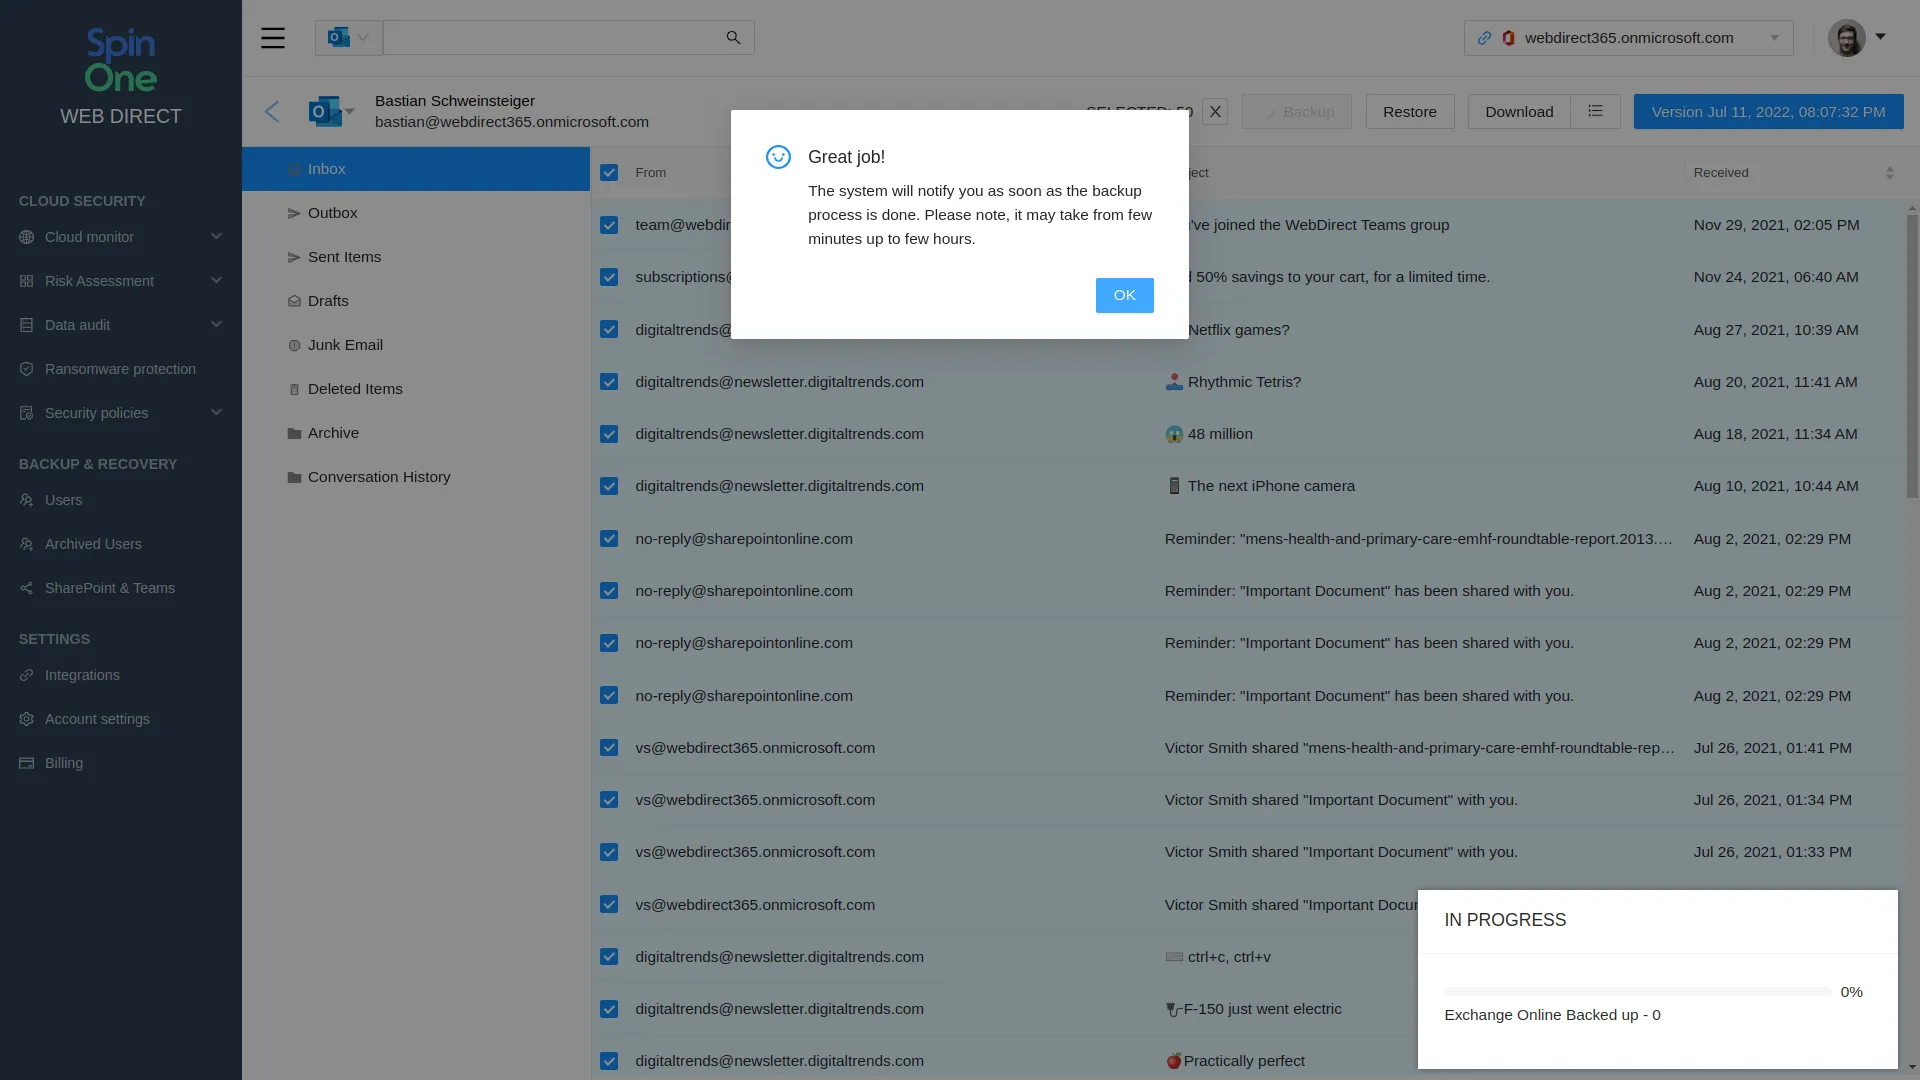
Done! All your Outlook messages are copied. This way, you can backup Contacts, OneDrive files, and SharePoint as well.
If you suddenly need to restore some files, you can do it by clicking the Restore button, which is always near the Backup button. You can also choose to restore only some particular messages by using a filter.
This way, the customization of the backup of everything (not only the emails) will take about 2 minutes. Your backed-up data is stored on AWS, GCP, Azure, or your custom storage location. An ability to choose a backup location is a way to diversify risks.
Have more questions about our Office 365 email backup? We answer them in our demo –
Was this helpful?
How Can You Maximize SaaS Security Benefits?
Let's get started with a live demo
Latest blog posts
Google Workspace Backup Solutions Comparison
April 26, 2024The number of Google Workspace (formerly GSuite) backup solutions is overwhelming, and choosing the right... Read more
What’s the Best G Suite Backup Solution?
April 26, 2024In today’s digital age, businesses rely heavily on cloud-based services like Google Suite (G Suite)... Read more
Reducing Browser Extension Risk with Spin.AI Risk Assessment + Perc...
April 24, 2024Spin.AI is collaborating with Perception Point: integrating the Spin.AI Browser Extension Risk Assessment within the... Read more
